

Surprise surprise!

Dealer South, None Vul.
In first position, you have opened your balanced 19-count with 1♣:

Your partner responds 1♥ and then signs off in 3NT over your 2NT rebid:
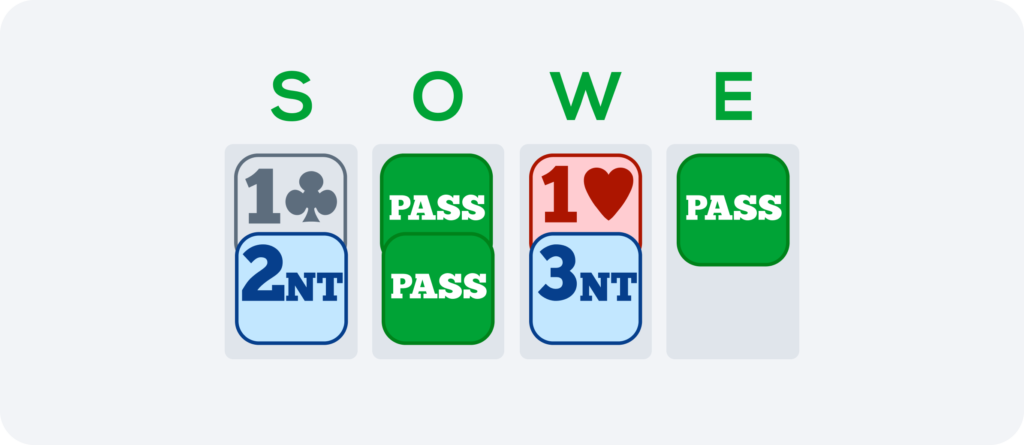
West chooses to lead the Spade 2 and now it’s up to you to play the hand.
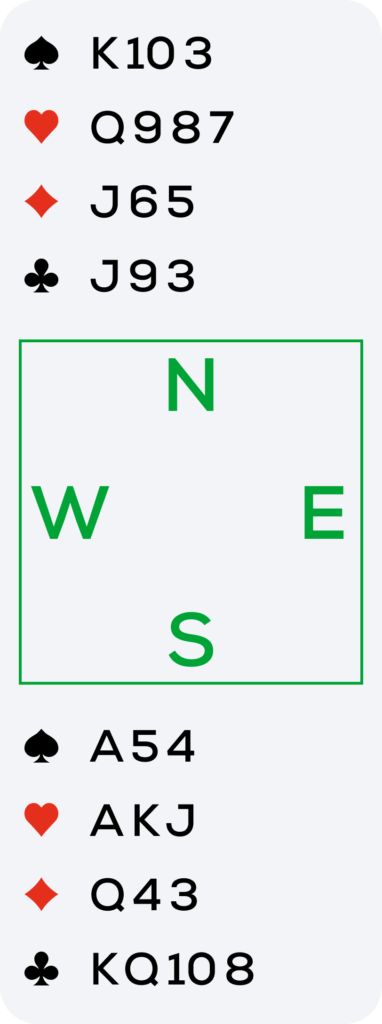
Contract: 3 No-Trump.
Lead: ♠2.
How many winners do you count?
You have six with Ace-King of Spades and four Hearts.
How will you establish the three missing tricks?
Quite simply by dislodging the Ace of Clubs.
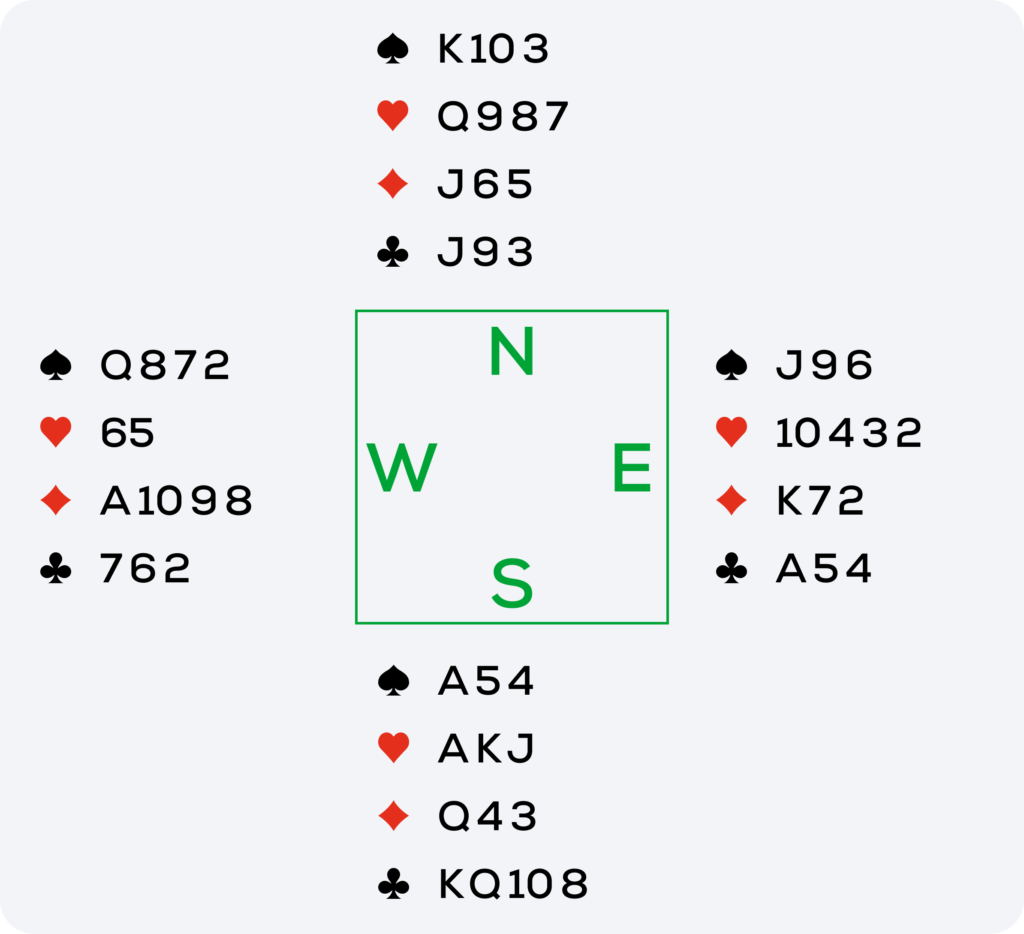
First problem: do you play the King or the 10 of Spades at trick one?
Just in case West has led the 2 from QJx2 (without the 9, of course, or he would have led the Queen), it’s tempting to call for the 10, hoping to benefit from an additional trick that just “fell out of the sky”. This is what you do but, unfortunately, East covers dummy’s 10 with the Jack.
Do you win this trick?
Yes, without hesitation, because a Diamond switch from East could beat a lay-down contract. Don’t forget that you have to get off lead to establish your Clubs. You are in hand with the Ace of Spades and you now start to play Clubs which will turn out to break 3-3. East wins the third round and plays back the Spade 7. You play the 4, West the 8 and duck in dummy. West doesn’t go looking very far and simply continues with the Spade 9, East following with the 6. You get back to hand with the Heart Ace to cash your last Club but then, when you cash the Heart King and collect a small card from both defenders, you feel a certain doubt creeping up on you.
Which one?
You suddenly realize that you are going to be a trick short if the 10 of Hearts doesn’t fall on the next round. And, indeed, this is what happens: when you continue with the Jack of Hearts, West discards a Diamond. You must say goodbye to the Queen of Hearts, and with three Clubs, two Spades and…only three Hearts, you’ve gone down by a trick.
What should you have done?
Before doing anything else, cash your three blocking honors: Ace-King-Jack of Hearts.
And then?
Reach the Queen of Hearts thanks to your Clubs by playing the 8 to the 9 and then, if necessary, the 10 to the Jack.
Yes, but if East has the bad idea (for you) to duck twice, how will you get to the fourth Club in your hand?
With a Spade. This is why a careful declarer must plan ahead and resist the siren song that is audible after the opening lead and instead of trying a finesse take care to win the first trick in dummy with the King!
The principle
The order in which the suits must be played is very often of the essence. Thus, between Clubs to be set up and Hearts blocking, it is the latter suit that is best played first when you can only communicate thanks to the other suit, Clubs. On the other hand, one of the main difficulties of declarer play is that an action performed at trick one or two frequently irreversibly determines what will happen in the middle or at the end of a deal. In bridge, as in life, without a degree of anticipation, there is no salvation.
What did you think about this article?
Share your opinion in the Commentary Section!


Great
Excellent
Beautifully written. Excellent.
Great
Love the walk through!
Thank you!!
Excellent exercise in planning card play
Many thanks
In between the different training sessions, this is a quite helpful article! Thanks for that!
Excellent. Thank you
Wonderful!
Great treat, good lesson
Great lesson ! Thank you.
Excellent. Great lesson
Perfect . Thank you.
very good
very useful. thanks
knjhygtyftrdsss
Made me think and plan more carefully
Very helpful. Thanks.
I liked the plan that shows or has you think of the strategy and why. Thank you, Tom33
Thank you – helpful!
A solid review.