

Shahzaad Natt’s tournament held in September: deal analysis
Have you played Shahzaad Natt’s tournament in September? Whether you have played it or not, watch a video replay of his tournament and enjoy his tips to improve your level!
Here is a summary of the most interesting bits of analysis in this tournament.
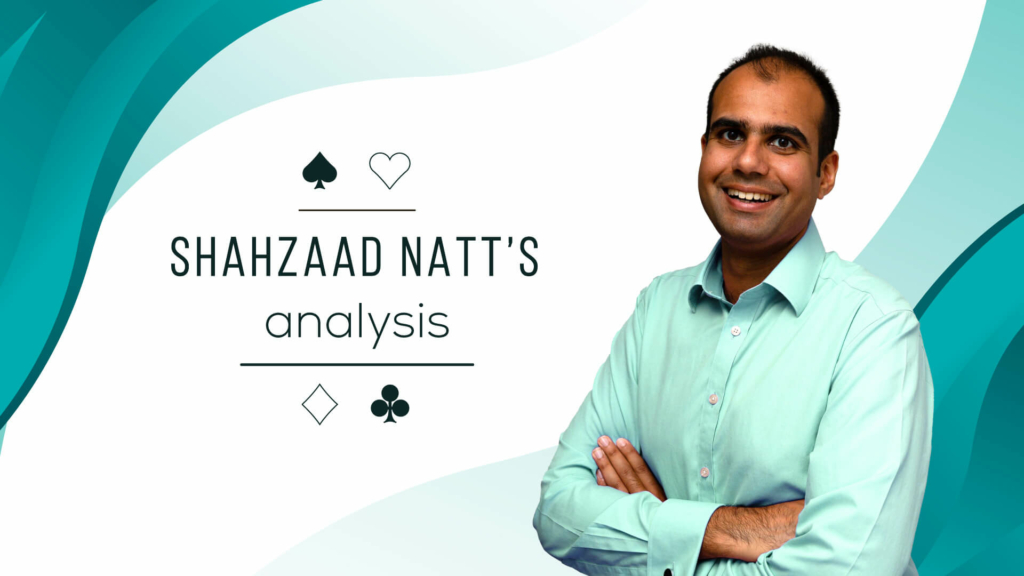
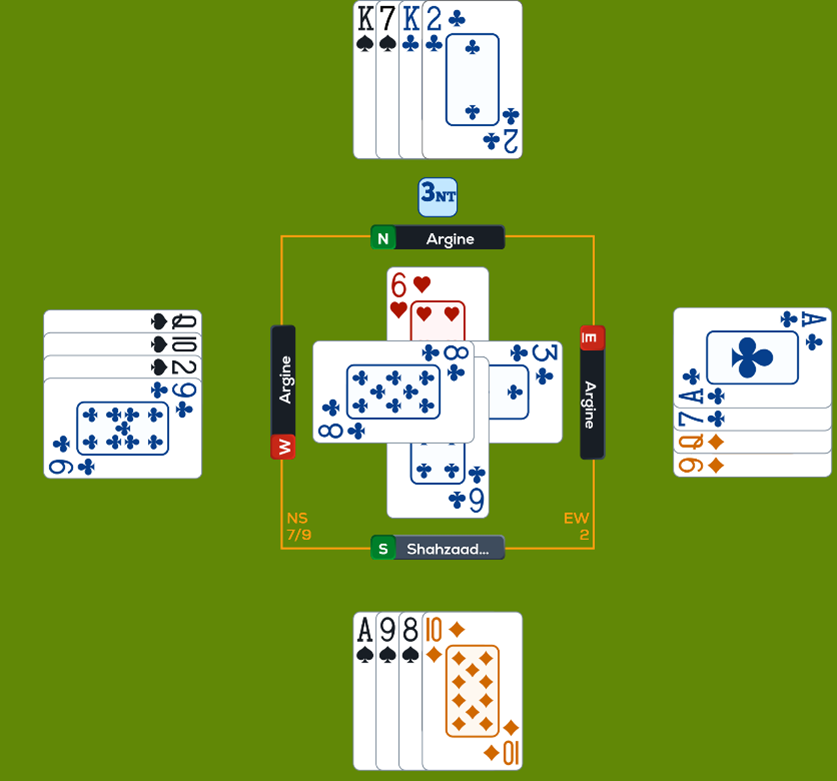
Deal #1
A few key points on this deal.
- Checking the count signal at trick 1. This gives you an idea of how many times it might be necessary to duck.
- Noticing the potential of the heart suit: if East has Tx or Jx there will be a finesse position in Hearts after cashing the Ace and King. It is a matter of good technique to unblock the heart Nine and Eight – although not actually necessary here, since we have plenty of entries. It’s also worth noting that it is superior to take a finesse, rather than playing for JTx trebleton in East, when we see an honour. This is a classic example of the Principle of Restricted Choice.
- Although it didn’t manifest itself on the deal, if West had had 5 spades and JTxx(x) of Hearts, he could have been squeezed between the last spade and his heart stop.
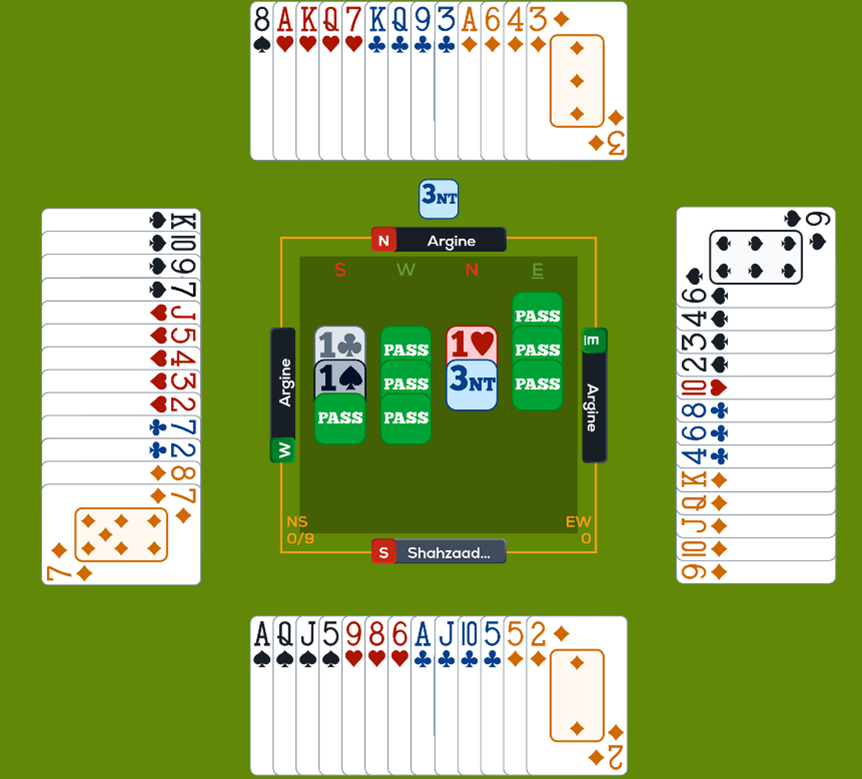
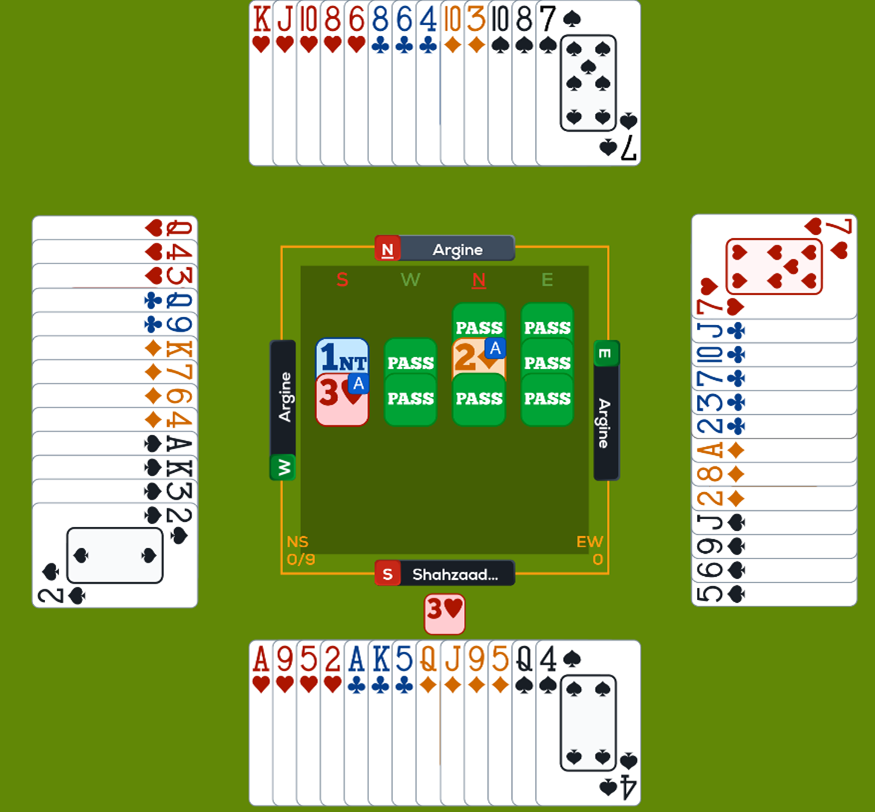
Deal #2

Definitely the most complex deal of the bunch and one on which I didn’t cover myself in glory. I made a series of poor guesses.
This was partly because I had forgotten that East wouldn’t open 1NT with this hand. Argine often doesn’t open 1NT with a prime hand with a 5-card major, whereas I would always open 1NT.
At the time of play, I suggested that ruffing the third trick in Dummy might be beneficial if East had T9 of Clubs; I now think this is very unlikely, as they probably don’t have length in Clubs (they have 5 spades) and they almost definitely have a top club to justify their opening bid.
Many possible takeaways but I think the best would have been simply to discard at Trick 3.
Deal #3
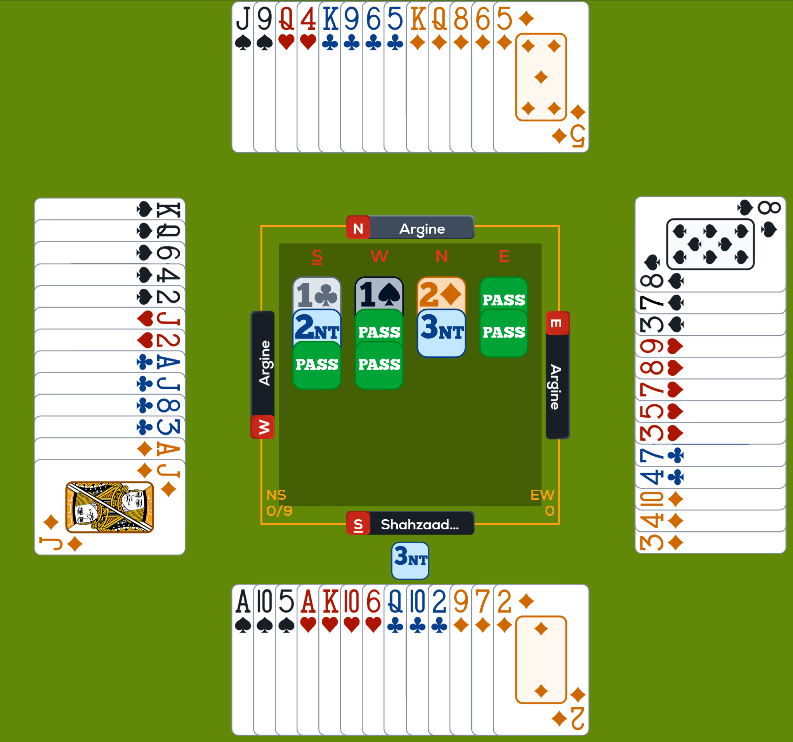
Some important ideas:
- Checking the count signal in Diamonds. We have very few entries to both hands and may have to play for Ax in West. Depending on the cards played by East and West, this may or may not be consistent. If Ax isn’t possible, we may need to switch to clubs.
- When West leads the Four of Spades, we know they have exactly 5 spades, as they showed at least 5 for their overcall and we now see the 3 from East. It’s not obvious how this will be useful yet but it is vital to always consider the shape.
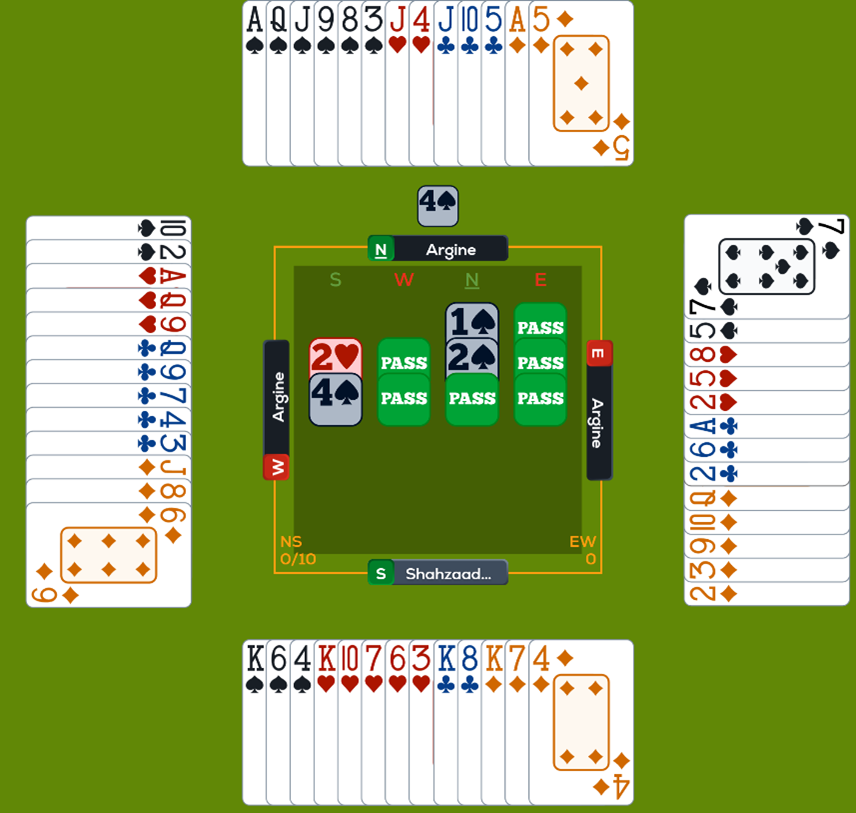
Deal #4
I believe that the interesting points on this deal come from the bidding.
- I think playing with a partner that is expecting it, you should open 2S. I generally believe in over-pre-empting by one level at favourable vulnerability. Particularly in 1st and 3rd seat, when either partner or the opponents are unlimited. Your partner should raise cautiously facing this strategy.
- Even if you think an action may be best in isolation, it may not be the best play in the moment. I think opening 2S here would be a mistake, as Argine is unlikely to be in on the joke. Furthermore, it is a bid which will increase the variance of your results. I think that if you are a good declarer, at MPs, you should strive to play in a normal contract and take more tricks than everybody else.
Deal #5
Some points of good technique:
- Working out the diamond break from the spots on the opening lead.
- Realising that once a heart had been discarded, they must be good (based on the count signals).
- After misguessing the clubs, we still had the potential for making an extra trick. In the diagrammed position, imagine that East had started with Tx in spades, rather than xx. Imagine, also, that West had started with the club Ace. Now, when we cash the spade King, the Ten will drop from East and our A9 will form a major tenace. We would now have the option of exiting with the club King to throw West in. We would have to guess correctly and we would not be making any more tricks if East had started with that card.
Deal #6

Important card-play ideas in yet another 3NT:
- Realising the potential of the club 7. After the opening lead, we can deduce that West has led from 98xx(x) (assuming a lead from length – which is what Argine prefers). After the Jack is covered by the Queen, we will have a major tenace, potentially allowing us to throw West in.
- The spade suit has some potential to come in for one loser after the Queen is covered, even if it is not 3-3. We can catch doubleton Ten or Nine. Thanks to Argine’s count signals, we didn’t have to concede an extra two tricks unnecessarily.
Deal #7
The main idea in the bidding is that jumping to 3H has a few benefits: firstly, sometimes partner has a hand that isn’t strong enough to invite but will produce a game opposite four-card support. For example: x KQxxx xx Qxxxx.
Secondly, the opponents are very likely to balance over 2H and find their likely spade fit – this means that we are going to compete to 3H anyway. We might as well do it before they do.
The key idea in the card play is that although there is a normal play in trumps (playing for the drop), the ‘second-best’ play is actually very close. Even a small amount of information could persuade us to finesse instead. It is a matter of good technique to try to gather information in the side suits before making the crucial decision in the guess suit.
Deal #8
The key idea here is guessing in Clubs. Both diamonds and clubs are unbid suits here, so East could plausibly have led either of them. However, when he holds the club Ace, he would never lead a club but he might lead a diamond. Furthermore, it looks as if East has led from QT9 and if East held Qxxx(x) in Clubs, that would have been a more attractive lead. All this makes us lean towards playing a club to the K.
On a practical note, it is worth leading the J to try and entice a cover, since Argine covers honours a little too frequently.
What do you think of this article?
Share your view with other bridge players in the Comments section below.


Shahzaad’s analysis is excellent and he is a strong addition to the Funbridge Ambassadors. Insightfull points clearly expressed. Thanks Shah !