

India Natt’s tournament held on 18 June: deal analysis

Have you played the India Natt’s tournament held on June? Whether you have played it or not, watch a video replay of his tournament then enjoy India’s tips to improve your level!
Here is a summary of the most interesting bits of analysis in this week’s tournament.
#Deal 1
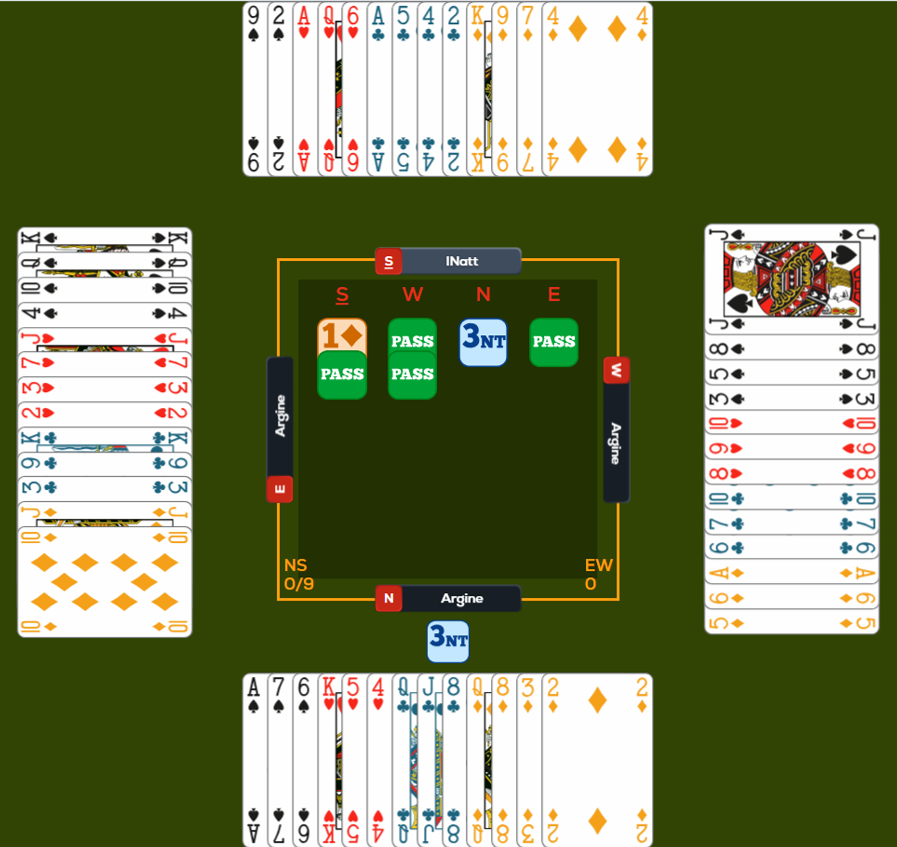
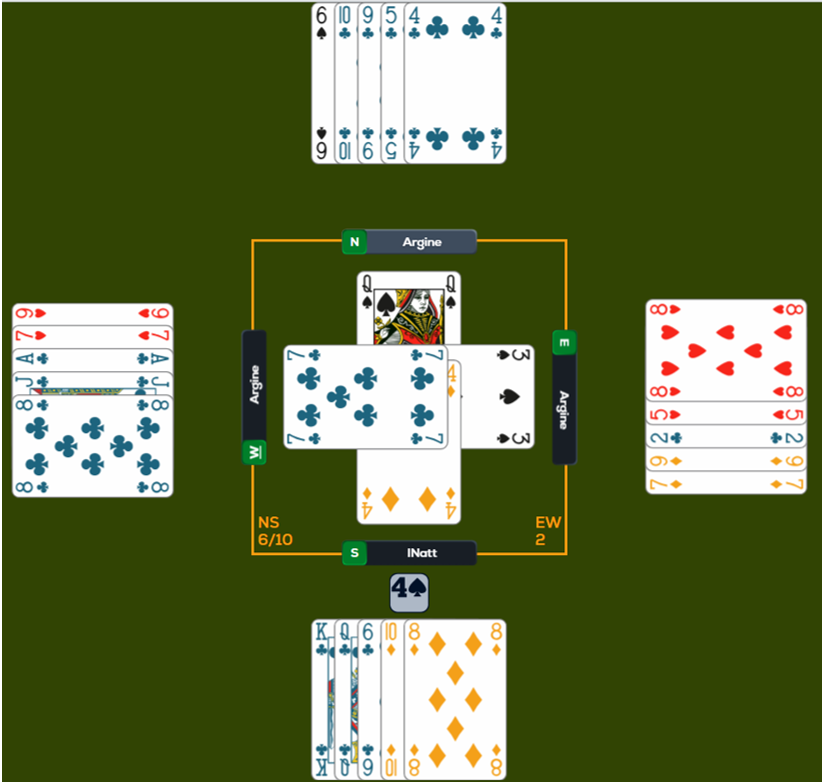
There are two main parts to this deal:
- Ducking the ♠ lead twice in case the ♠ are 5-3. That way, you sever the communication between the opponents’ hands (meaning that the player with three ♠ will have none to return to his partner if he wins a trick later).
- Guessing who had the ♦A. Sometimes, you play in a particular way not just because it is more likely but because it is more beneficial to you. On this hand, if the ♠ are 5-3, it is most likely to be West who has 3 (partly because it was his partner who led ♠ and partly because he didn’t overcall 1♠ over 1♦). Therefore, he is both more likely to have the ♦A, since he will have more ♦ on average, and safer to lose a trick to.
Once you have decided who you are playing to have the ♦A, you should play a low ♦ through that hand: in this case, low from the dummy.
#Deal 2
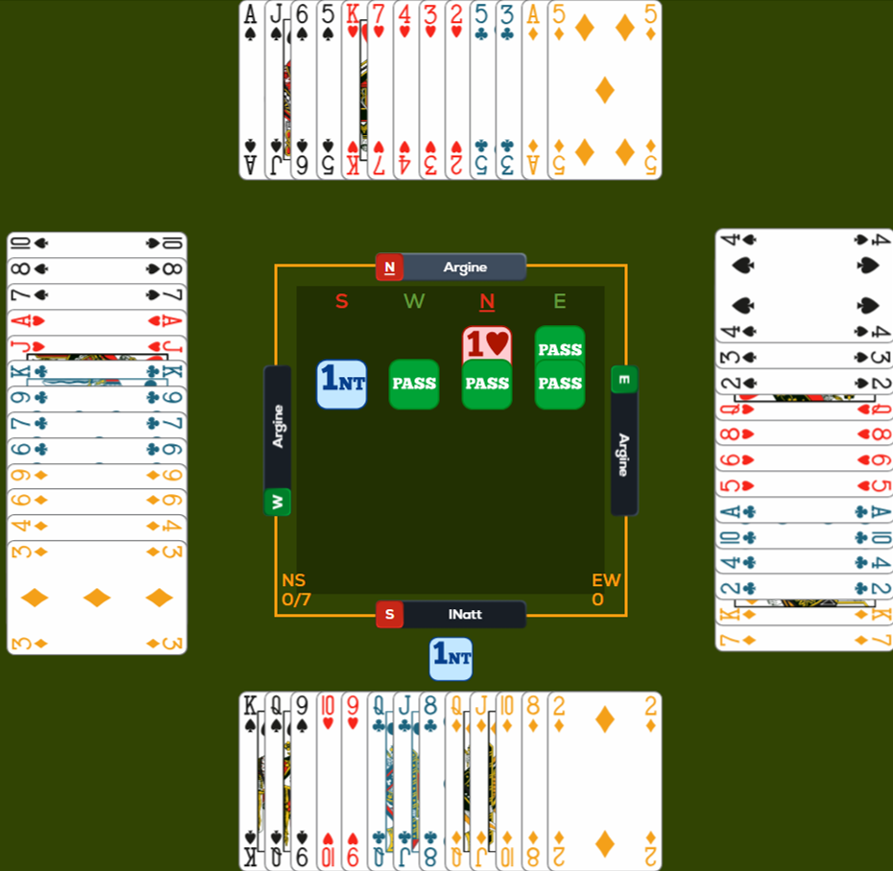
This was an interesting one for matchpoint strategy. After ♦ to the ♦K and a ♦, should you:
- Cash out to ensure your 8 tricks; or
- Play a ♥ to the ♥K, hoping West has the ♥A for your 9th trick. However, this risks them taking 6 tricks (♥AQJ, ♦K and ♣AK) and therefore holding you to 7.
A good principle to remember is that if something good has already happened to you on the board, you should enjoy what you have rather than pushing for more. Here, we received a very friendly ♦ lead, so we are happy with our lot. Plus, when the ♥A turns out to be onside, we end up with our 9th trick on this occasion after all!
#Deal 3
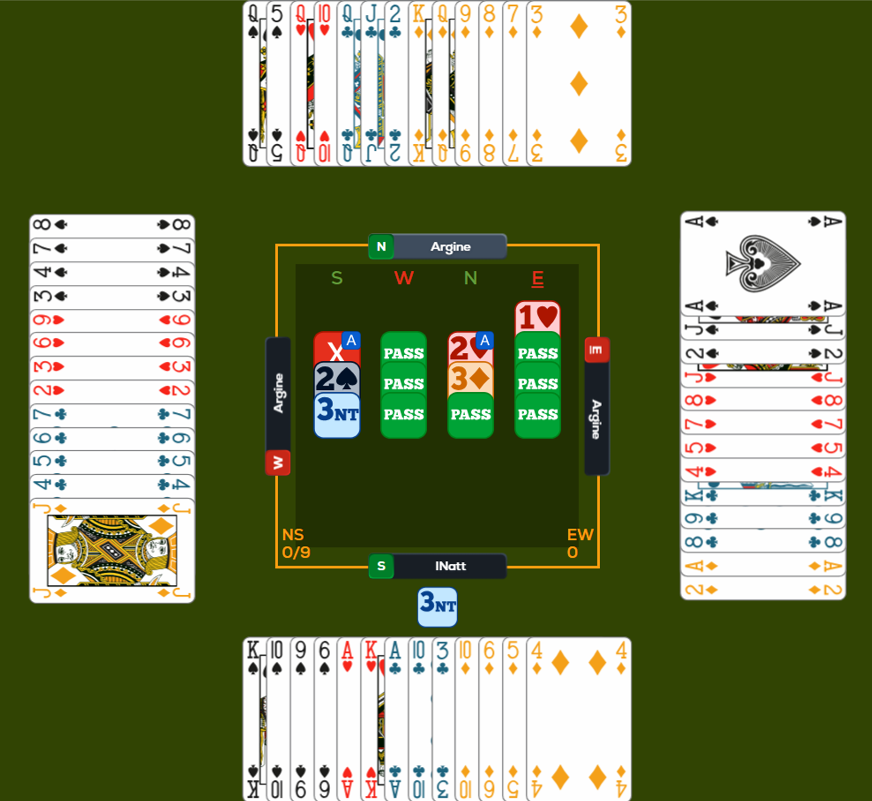
A good trick-counting exercise! Even if the ♦ behave and you establish 5 ♦ tricks, you only have 2 ♥ and 1 ♣ to add to that, bringing your total to 8. Imagine how the play will go: ♥, knocking out your ♥A, ♦ losing to the ♦A, ♥ back to knock out your ♥K. You cannot afford to lose a trick now; there is no safe hand! Therefore, you need the ♣K to be onside.
This is one of those funny hands where, depending on where the crucial card is, you will either make 8 tricks or 10 – 9 should be a rare result!
#Deal 4
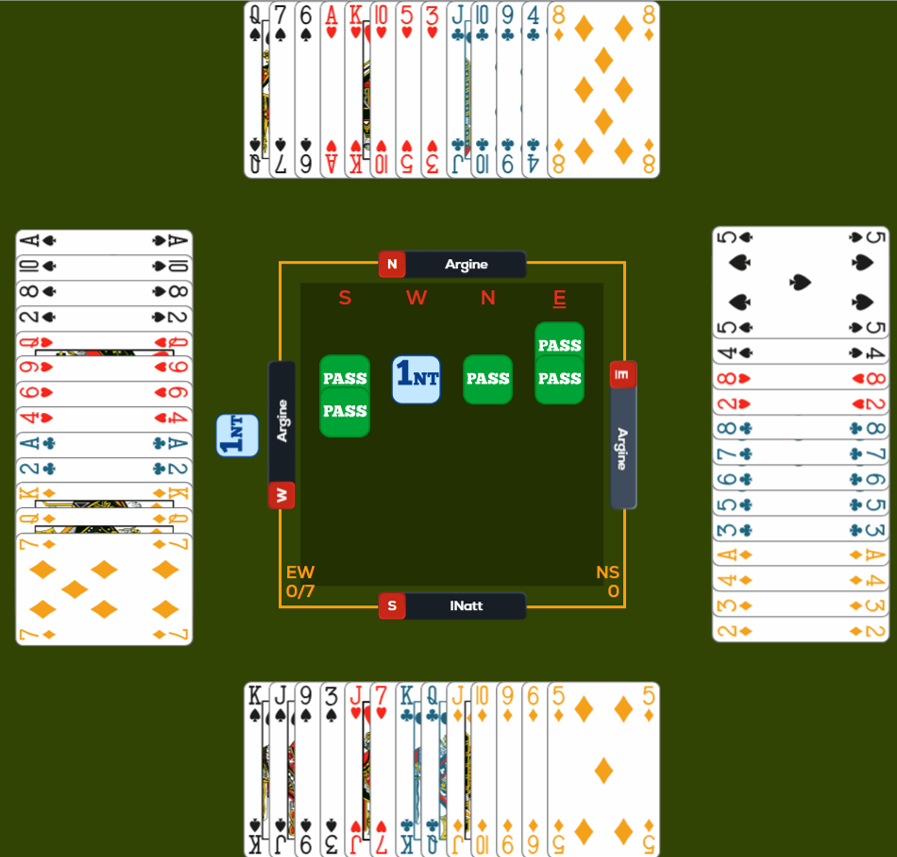
With ♥J-doubleton, when Partner leads a big ♥ honour against NT, it is almost always a good idea to unblock the suit by playing the ♥J. Imagine what will happen if you do not. Partner will either:
- Cash the second honour, squashing your ♥J anyway but voiding you in ♥ so that you cannot play one through Declarer’s hand.
- Try to get you to win a trick so that you can play a ♥ through Declarer. This is better but because the suit is blocked, you may be left on lead with no more ♥ to play. This can cause a timing issue.
If you instead unblock your ♥J, you can play your small ♥ when you get back on lead later, allowing Partner to establish his suit without having to use up an entry.
#Deal 5
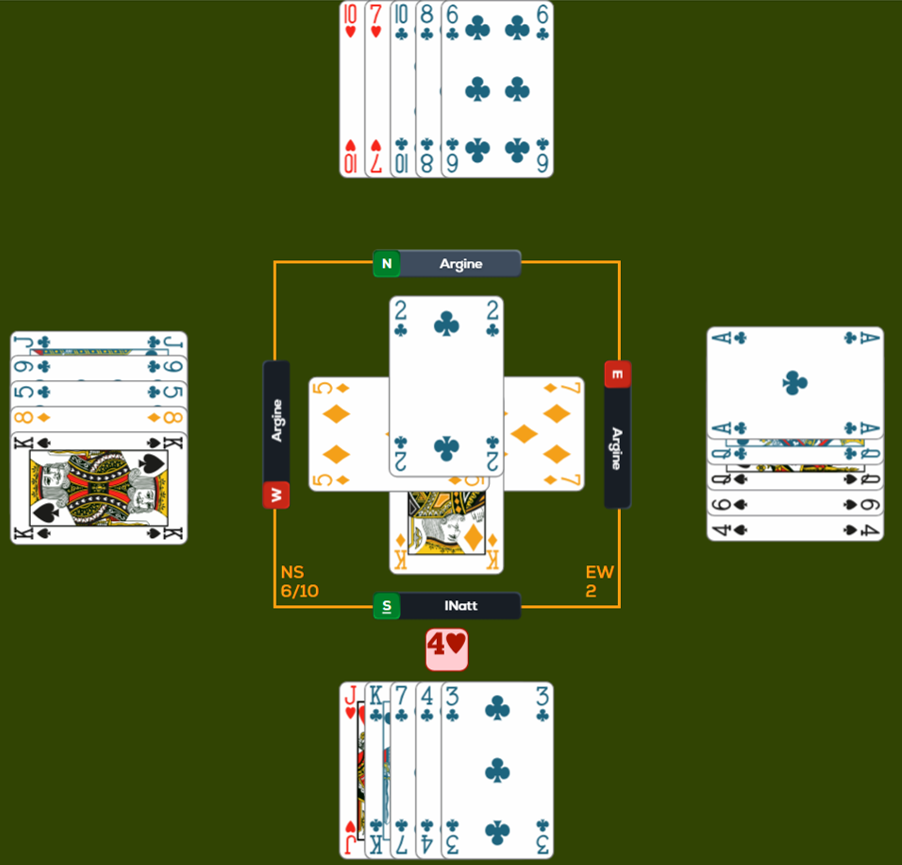
After 8 tricks, this was the position. We could only afford to lose 1 more trick, which would presumably end up being the ♣A. On lead in the dummy, how do we arrange to only lose 1 more trick?
In isolation, you can have your cake and eat it by playing low to the ♣K, crossing back to the dummy and choosing whether to finesse against the ♣J the second time around. But here, we could only get to the dummy by ruffing a ♦ over; if we played small to the ♣K and ruffed a ♦ back, the player with the ♣A would be able to rise with it and cash ♥ with impunity, as we would have no trumps left!
Therefore, our play for one loser is much simpler: finesse against the ♣J. If that wins, we can push out the ♣A by force and throw the fourth round of ♣ on the ♦ winner; if the ♣A beats the ♣T, we can ruff the return and still have the ♦T and ♣KQ to take.
It didn’t work today as both the ♣AJ were offside; but it was our best hope!
#Deal 6

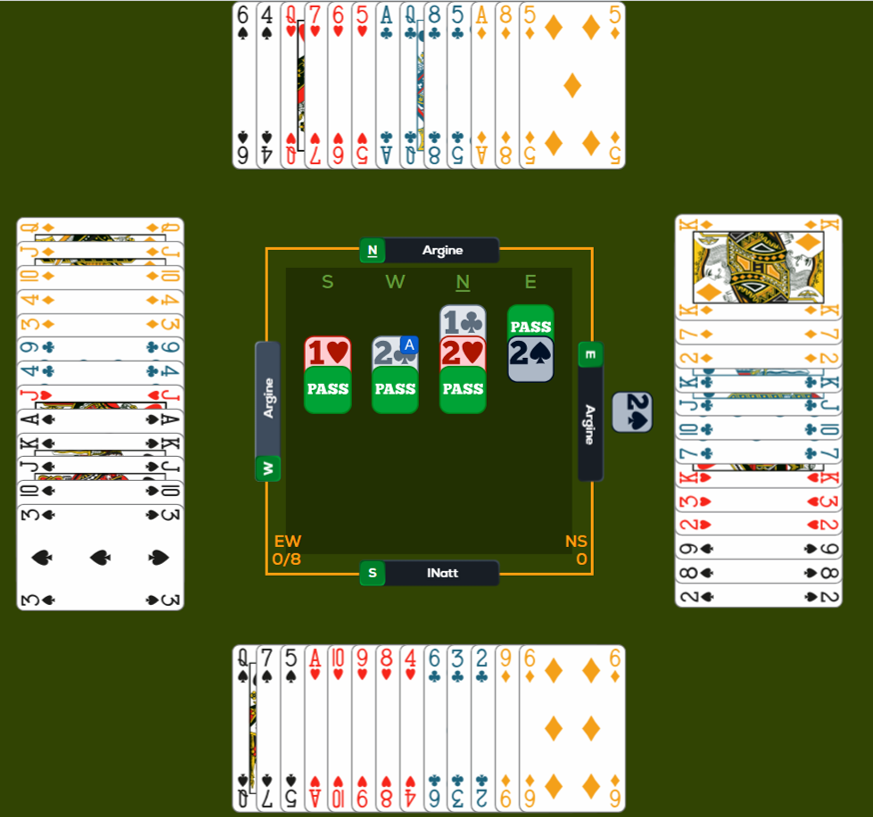
The bidding had an important element of matchpoint strategy: competing for the part score. At MPs, you can edge up the list of results by improving your score very slightly. On this occasion, it was a difficult example, as we were vulnerable; the key is to weigh up the possible scores that competing might result in.
Looking at our hand (the one at the top, South) with just two top tricks, it is hard to imagine a hand that Partner could have where 2♥ is going down. Assuming that it is making 8 or 9 tricks, then, the score we have to beat is over 100 but under 200 (-110 or -140); this is nearly always the case on a competitive part-score deal. We can therefore afford to go one down in our contract (-100) and have still improved our score. If we get doubled, one down is already -200, so we have to make it; this is the main reason why doubling part scores aggressively at MPs can bring big rewards.
The most interesting part of the play was our play in ♦ as Declarer – not something you might expect on first glance! Under East’s honour, when West plays the ♦T, we do best to play the ♦J. This is because the ♦T has already told East that we have the ♦J, so we are following the principle of “playing the card we are known to hold”. This reduces East’s ability to work out exactly which ♦ his partner has, especially when we hide our ♦9 – a card that West might well have once he has played the ♦T.
#Deal 7
This is a great deal for visualisation: both of how the play will go throughout the hand and the way the defenders will play based on what we do.
On Trick 1, we counted 1 ♠ trick (due to the lead), 5 ♣ tricks (assuming that the ♣ are 3-2, which they normally are) and no tricks in the red suits. We need two more for our contract. ♥ is a frozen suit, meaning that whoever plays the suit first gives away a trick; the ♦ have potential for 1 trick but the suit is blocked, preventing us from taking more.
Therefore, we need help from the opponents in the non-♣ suits: they need to play ♠ for us to allow us to take advantage of the ♠A being onside; or open up the ♥; or give us an entry to our ♦J. So, we want them to win a trick after the ♦ have been unblocked; if they rise with the ♦A on the first round, they can safely return a ♦.
As a defender, it is often right to duck an ace on the first round of a suit, attempting to either cut off entries or wait for more information about the hand before winning so that we play the right suit next. With that being the default, we can use this to our advantage as Declarer here. If we run the ♣ and then play ♦, West might well have learned enough from his partner’s discards to correctly win the first round of ♦. However, if we play a ♦ on Trick 2, he won’t know much of anything about our shape and is likely to duck. Then, we’ll run our ♣ before playing the second ♦ and at that point, whatever he does will give us a trick. Sneaky!
#Deal 8
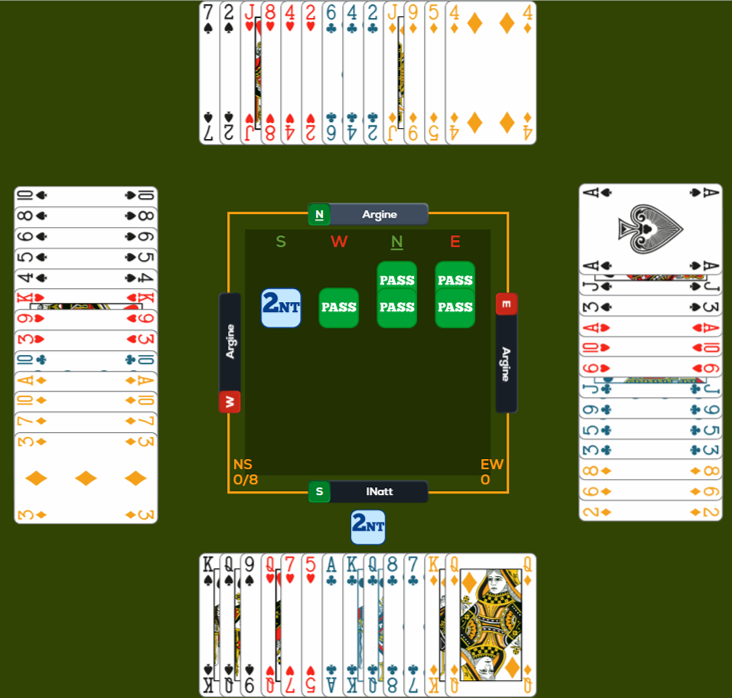
What should we lead on this hand?
We know a fair amount about the hand from the bidding:
- West: we know that he is 5-5 in the “pointy” suits (♠/♦) and therefore most likely 2-1 or 1-2 in the “round” suits (♥/♣). Given that our partner has supported our ♥, West is most likely to be 5-1-5-2.
- East: did not pre-emptively support ♠, so unlikely to have 4, but chose to bid freely, so must have 3.
- North: opened a short 1♣ but has a doubleton ♠; he must therefore have 4 or 5 ♣. Does not have a singleton, so must have 4 ♥. He will either be 2-4-3-4 or 2-4-2-5.
All this makes Declarer’s shape likely to be 4-3-3-3 or 4-3-3-3.
Although, on hands like this, our doubleton ♦ seems like a sensible lead a priori, there are two reasons not to lead a ♦: 1. We think the opponents have a ♦ fit as well as a ♠ fit, so that is likely to help set up their tricks; 2. We probably don’t need the unlikely ruff, as we often already have a trump trick with ♠Qxx.
A ♣ (now known to be Partner’s suit) is another possibility but since East is likely to have some values in ♣, as he often has four, we might end up helping Declarer to take finesses in the suit, as well as giving away some tempo.
Finally, we consider the dreaded unsupported-Ace lead in ♥. With more ♥ length on our right, it makes us nervous in case East has the ♥K. However, Partner is more likely to have the ♥K since he has shown four of them; and even if, as today, Declarer does have the ♥K, will the discard help him that much? Only if he has the ♣A and Partner has ♣KQJ – otherwise, we know all his ♣ finesses are onside already! Getting a chance to look at the dummy and our partner’s signal could be very helpful, so the ♥A is my first choice.
#Deal 9
Here, we reached an interesting end position. We knew at this point that East was 6-3-2-2 at the start of the hand: information that we could use to our advantage!
Stuck in our hand, we needed to play ♣ in a way that would mean only being one down in our contract: therefore, for only two ♣ losers.
- If East’s doubleton is the ♣A, we succeed by playing low out of our hand.
-If West rises with the ♣Q or ♣J, the ♣A is then singleton and East will be forced to win and play a ♠, giving us a ruff-and-discard.
-If West plays low, our ♣T pushes out the ♣A and our ♣K becomes a winner.
- If East’s doubleton is the ♣Q or ♣J, we succeed by playing the ♣K from our hand.
-If West ducks, we have stolen a trick.
-If West wins with the ♣A, the ♣Q or ♣J is now left blocking the suit. On the second round of ♣, East is endplayed into giving us a ruff-and-discard if his partner allows his honour to win; alternatively, if he has singleton ♣J remaining and West squashes it with the ♣Q, our ♣T is promoted.
- If East has ♣AQ, ♣AJ or ♣QJ, either play will work and it doesn’t matter what we do.
- If East has ♣xx, nothing we do will work and it doesn’t matter what we do.
The best play is the ♣K from our hand, as that works better when East has ♣Qx or Jx; playing low only works better when he has ♣Ax: half as likely because it is half as many doubletons.
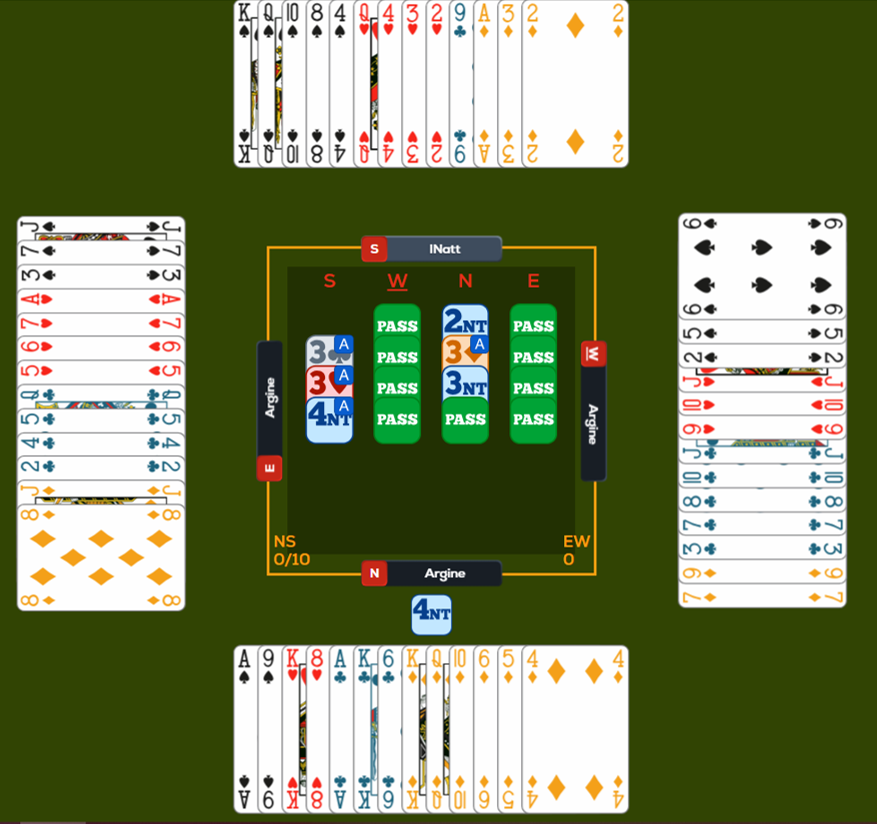
#Deal 10
There are a few good lessons to be learned from this hand:
- Keep your focus even at the end of the tournament!
- Don’t assume that the opponents are playing in the way you play!
- At MPs, there is a lot to be said for making the “normal” play if you feel short on clues.
With East-West playing extremely reliable count signals (robots are good with that sort of thing!), it was a good idea to play the ♠ first here. East followed with the ♠3 and West the ♠2. As these are the two lowest spot cards, we know that they were both playing low=odd. On the second round, when they both followed, we knew the ♠ couldn’t be 5-1, so the correct thing to do was to cash the third round of ♠ and go for 13 tricks!
As a side note, we were doomed to miss a slam as soon as North opened 2NT rather than 1♦. Even after I had shown a slam try with 5 ♠ and 4 ♥, he had no way of knowing whether my shortage was in ♦ (which would be terrible for him) or ♣ (which would be fine). If anything, a singleton ♦ in my hand is much more likely.
What did you think about this article ?
Shareyour opinion in the Comments Section!


Great article with some good points and also teaching me what the ‘pointy’ and ‘round’ suits are 🙂
More of this type of analysis please. Ms. Natt is an excellent explainer of bridge hands.
I’m not following all of it but it is still very helpful. Hopefully with more experience, I will understand more. It is great to have this sort of analysis.
A good format for distilling the important point of a hand.